Build your own Button Box.
Make a screen-free box for sending WhatsApp voice messages to family.
- Follow eight steps, from parts to your first hello.
- Print an enclosure or start with a shoebox.
- Get help from the people building alongside you.
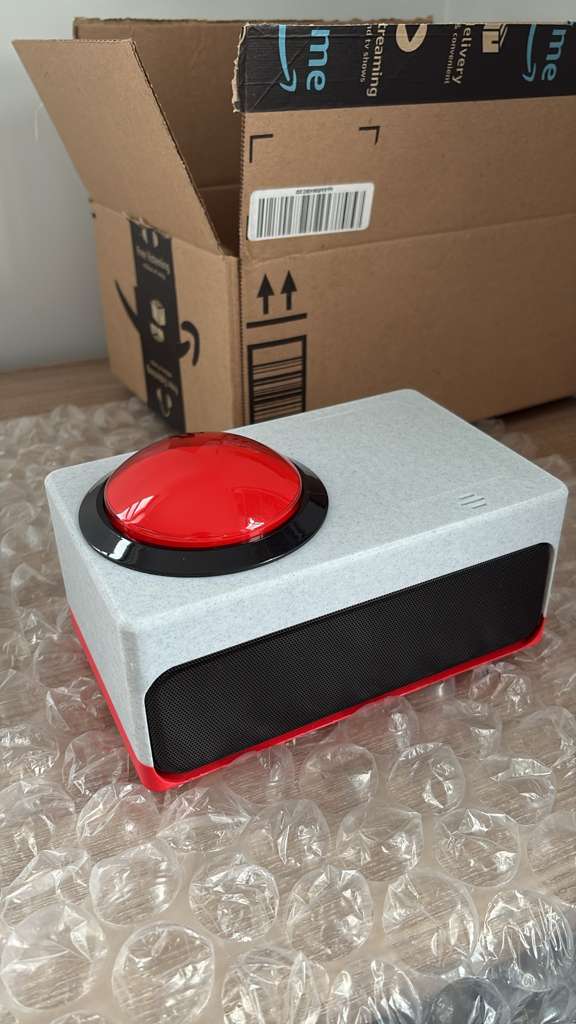
Buy the materials
Start with the Pi 4 reference build.
-
01
1 set
Raspberry Pi 4B
The small computer inside the box. The reference build uses 1 GB RAM.
Choose a seller ↗ -
02
1 set
32 GB microSD + reader
The card stores the software. Pick a reader that fits your computer.
Reference card ↗ - 03 1 set
-
04
1 set
TONOR G11 USB microphone
Records your voice. Keep its casing for a roomy first build.
Reference microphone ↗ -
05
1 set
LIELONGREN 8 W USB speaker
Plays incoming messages. Keep the speaker in its casing.
Reference speaker ↗ -
06
1 set
100 mm arcade button
The big record/play button. Check the lamp rating and terminal sizes.
Reference button ↗ -
07
1 set
Wires + insulated connectors
For the switch and any verified lamp circuit. Match your terminals.
Connector example ↗ - 08 1 set
Optional: NFC cards to choose who gets a message
For a first build, you can skip NFC and choose one default recipient or group. Add it later when the basic message loop works.
The reference HiLetgo PN532 kit needs soldering. The README suggests an assembled Waveshare PN532 NFC HAT if you want to avoid soldering. Check connector access and enclosure fit before ordering either. Add 13.56 MHz NFC cards and suitable mounting hardware.
Also have a computer with internet access, a phone for WhatsApp setup, a dedicated phone number for the box, and temporary network access for the Pi. Ethernet is useful during setup.
Done when you have the Pi 4, its matching power supply, audio devices, card and reader, button, and the connectors for your build.
Print a box. Or use a shoebox.
Choose the enclosure that matches your speaker and build. The software is the same.
Print the European speaker enclosure
This version is designed around the measured EL001 speaker: 187 × 56 mm at the front and 37.5 mm deep including the grille. Check your actual speaker and the rest of your parts before printing.
For printing, use the two *-print parts in millimetres and PLA. The base floor and lid roof already sit on the print plane, with the lid interior facing up. Inspect the slicer toolpath for your printer before starting. The assembly STEP is for review, not a third printable part.
Ask a build question or share your fit results in the community →
Print the original two-part shell
- Download the latest top STL and bottom STL. STL is the file format a print shop needs.
- Send both files to your printer or a local 3D-printing service. Use millimetres and 100% scale.
- Check the button opening and the fit of your actual parts before fastening anything.
The footprint is 192 × 120 mm. This is the earlier general prototype, not the EU EL001 enclosure. Use the repo files rather than an old newsletter attachment. Different parts may need a different enclosure.
Enclosure notes ↗Start with a box you have
- Choose a sturdy, non-conductive box big enough for the parts and cables.
- Mark the button opening using your button’s mounting dimensions. Have an adult cut it.
- Make openings for the microphone, speaker, ventilation, and cables.
- Secure the components with insulated mounts and support the cables so a tug cannot pull a wire loose.
Keep the microphone and speaker in their original casings if there is room. Treat cardboard as an adult-supervised prototype.
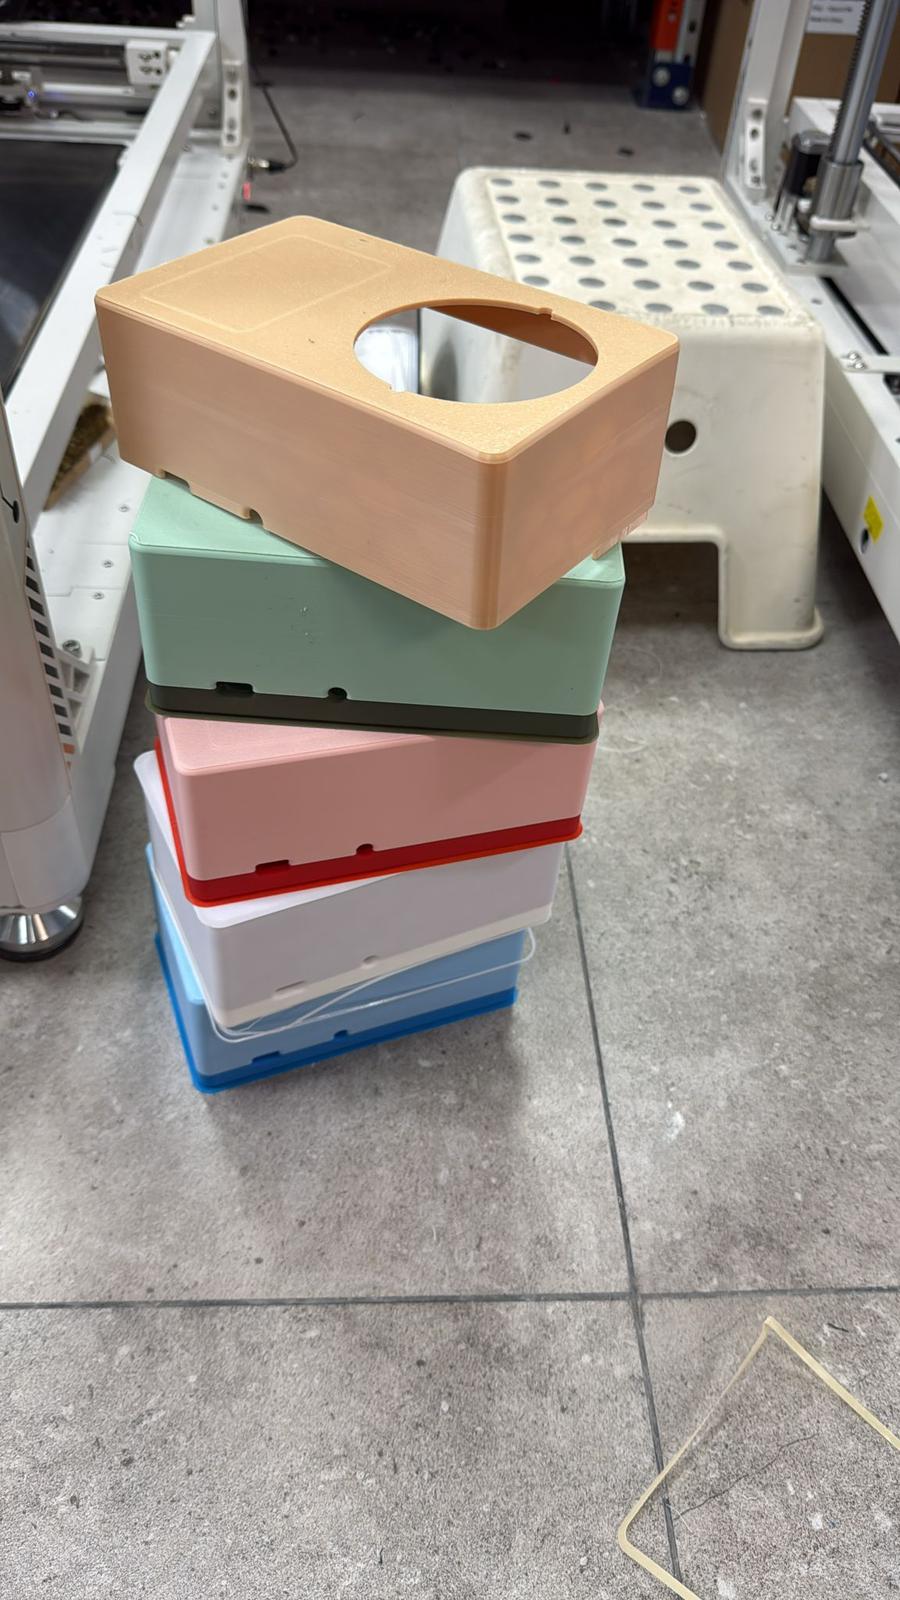
Done when your actual parts fit, the button moves freely, and you can secure the wiring while keeping vents clear.
Flash the microSD card
“Flash” just means put the operating system on the card.
- Install Raspberry Pi Imager on your computer and plug in your card reader.
- Choose Raspberry Pi 4, then Raspberry Pi OS Lite (64-bit), Debian 13 / Trixie.
- Choose your microSD card. Check its size and identity: writing will erase it.
- Set the hostname to
button-box-001and create an administrator calledadmin. Keep your password private. - Enable SSH, which lets your computer talk to the Pi. Use a dedicated SSH key if you already have one, or follow Imager’s authentication settings.
- Set temporary Wi-Fi access, or plan to connect Ethernet. Leave Raspberry Pi Connect disabled unless you need it.
- Write the card, wait for verification, and eject it.
Done when Imager finishes verification and the card is ejected. Keep the Pi unplugged for the next step.
Put the parts together
Work with the power unplugged.
See where everything goes
Rotate the box, separate its layers, and inspect the components in yesterday’s assembly guide.
Open the 3D assembly guide ↗- Put the microSD card into the slot underneath the Pi.
- Mount the Pi so its USB ports and power connector are reachable.
- Mount the button in the lid. Keep space underneath for the switch and its connectors.
- Secure the microphone and speaker near their openings. Plug their USB leads into the Pi’s USB-A ports.
- Have someone comfortable with low-voltage electronics check the switch, lamp, and any NFC wiring against your exact components.
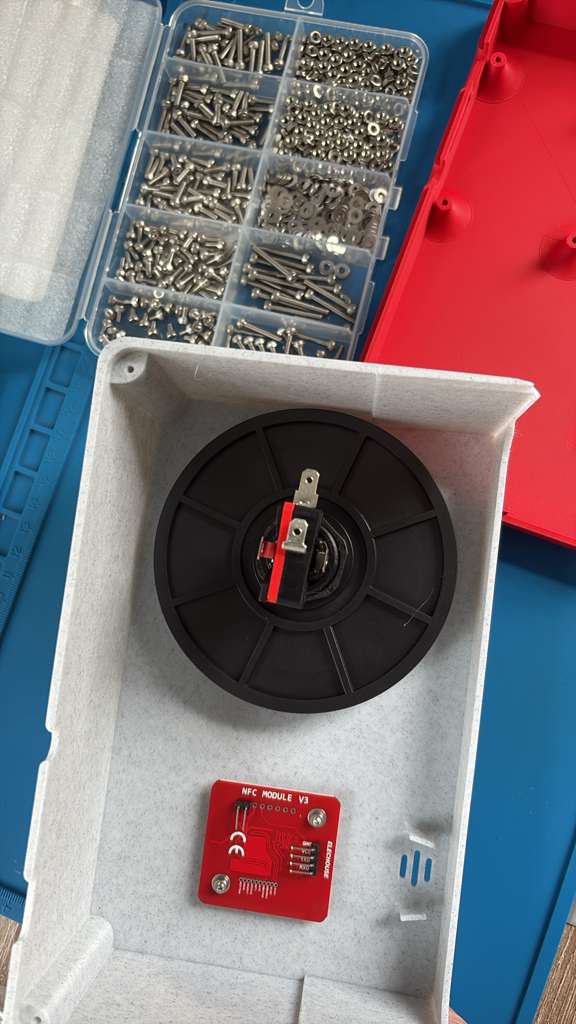
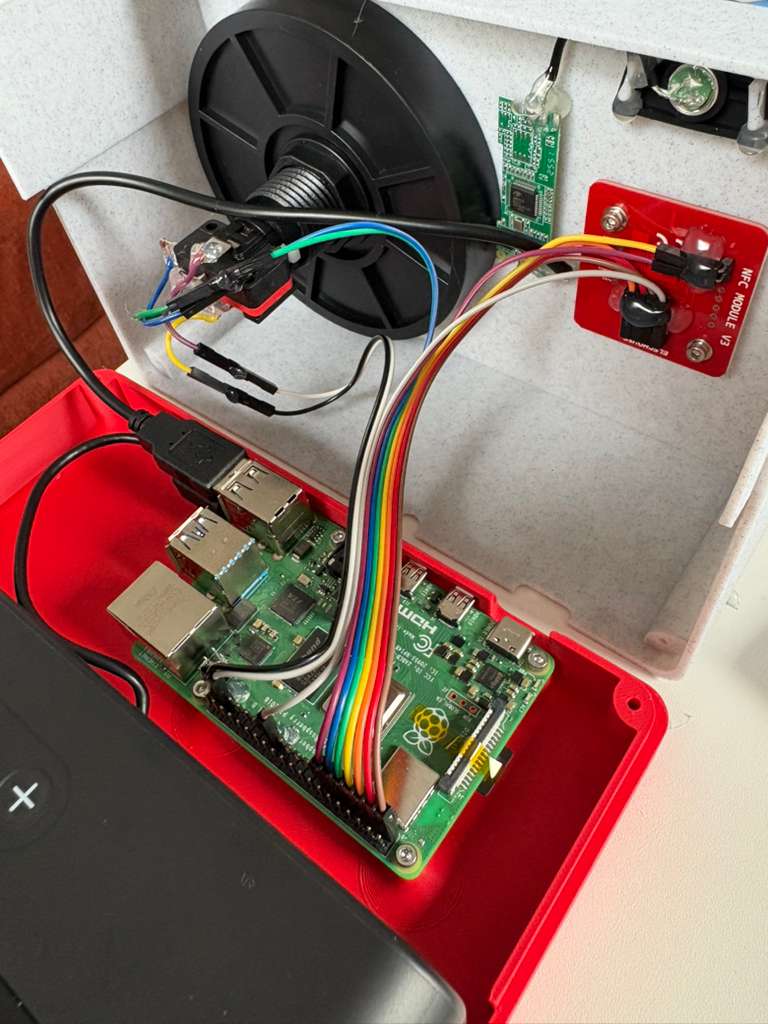
Button and NFC pin reference
This table describes software signals, not a complete wiring circuit. BCM numbers and the physical header positions are different.
| Signal | BCM name | Physical Pi pin |
|---|---|---|
| Button input | GPIO 17 | 11 |
| Lamp control | GPIO 26 | 37 |
| I²C SDA / SCL | GPIO 2 / 3 | 3 / 5 |
| PN532 reset / request | GPIO 20 / 16 | 38 / 36 |
| Ground examples | GND | 9 or 39 |
For the button’s dry-contact switch, identify COM and NO on your exact microswitch; GPIO 17 is the input, and ground is the return. Keep the separate lamp terminals out of that switch circuit.
Do not connect an arcade lamp straight to GPIO 26. Its voltage, current limiting, and driver circuit must be checked first. The public instructions do not yet specify the complete lamp circuit.
The NFC software uses I²C. Selector positions, supply voltage, and reset/request connections depend on the exact PN532 module. Use its own documentation; the photos do not establish a universal switch setting.
Done when a competent adult has checked the unpowered assembly, the enclosure closes, and no wiring or loose parts are exposed.
Install Button Box
A few commands, one checkpoint at a time.
Connect the Pi to your temporary network and then connect its power supply. Give it a few minutes to boot. Your computer and Pi need to be on the same network.
Open Terminal on a Mac or Linux computer. On Windows, use a Linux environment such as WSL with SSH and rsync; the provision script is a shell script. If that is unfamiliar, use the guided helper prompt below.
5.1 · Download the project
GitHub holds the project files. This command downloads them into a folder called button-box. If git is missing, install it from git-scm.com.
git clone https://github.com/button-box/button-box.git
cd button-box
git status --short --branch
ssh -V
rsync --version
On a Mac: install modern rsync first
If you do not have Homebrew, follow its installation instructions. Then run:
brew install rsync
PATH="/opt/homebrew/bin:$PATH" rsync --version
The command should report GNU rsync. On Intel Macs, Homebrew may use /usr/local/bin; use the directory shown by your Homebrew installation.
5.2 · Check the Pi
Use the username and hostname you set in Imager. The examples use admin and button-box-001.
ssh admin@button-box-001.local
tr -d '\0' </proc/device-tree/model
uname -m
grep -E '^(PRETTY_NAME|VERSION_CODENAME)=' /etc/os-release
You should see a Raspberry Pi 4, aarch64, and trixie. If any differ, stop and check your board and image. Type exit to return to your computer.
5.3 · Run the installer
From the downloaded button-box folder on your computer:
./scripts/provision.sh admin@button-box-001.local
Mac command with Homebrew rsync
PATH="/opt/homebrew/bin:$PATH" ./scripts/provision.sh admin@button-box-001.local
Let the installer finish. It copies the software onto the Pi; account setup comes next. Some internal commands still say messagebox. Keep those names as written.
Done when the installer prints BUTTON BOX SETUP COMPLETE without an error.
Connect WhatsApp
Give the box its own number, then choose who it can message.
- Get a dedicated number for the box through your mobile provider. A SIM or eSIM must support WhatsApp’s verification requirements; a data-only plan may not.
- Register that number in the WhatsApp mobile app on a phone. Keep access to the number and account for future verification.
- From your computer, start the guided setup below.
ssh -t admin@button-box-001.local messagebox-dev-onboard
This is the README’s terminal-assisted DIY route. Follow the prompts to link or verify WhatsApp, pick your first approved recipient, configure the optional dashboard, test the hardware, and start the selected services.
For a family group, add the box’s WhatsApp account to the group first, then select that group during setup. Start with an adult who is expecting your test.
Prefer the phone-browser setup?
This is a separate onboarding route, starting after installation. Choose it instead of the terminal-assisted route above.
ssh -t admin@button-box-001.local sudo messagebox-init-wifi-onboarding
Save the displayed hotspot name, password, and setup URL privately. Then arm the setup hotspot:
ssh -t admin@button-box-001.local sudo messageboxctl reset-wifi
This resets saved Wi-Fi profiles. Keep your recovery connection available. Join the displayed hotspot on your phone, open its setup URL, and follow the Wi-Fi and WhatsApp prompts. Rejoin home Wi-Fi after the hotspot disappears and open http://button-box-001.local/.
Choose a default recipient, run the two-way voice test, and allow any other recipients. Skip NFC or pair your cards, then choose Done to activate messaging. This experimental flow still needs complete fresh-device validation; report the exact step if it stops.
Done when WhatsApp is linked, the intended recipient is approved, and the selected messaging services have started.
Test each part
Check the hardware before your first conversation.
The terminal setup offers these tests. To run them again, open a Pi session and launch the hardware test:
ssh -t admin@button-box-001.local
sudo -u messagebox -H /opt/messagebox/dev/hardware-test.sh
- Speaker: hear the test at a comfortable volume.
- Microphone: record and hear your own voice.
- Button: confirm presses register.
- Lamp: check the verified lamp circuit.
- NFC, if fitted: check your reader with a card.
- Network and WhatsApp: confirm the connection.
This test does not send a WhatsApp message. If you skipped NFC, record that choice instead of treating it as a broken reader.
Done when every installed component passes and the box stays stable, with no excess heat, loose connections, or unexpected restarts.
Send a hello. Get one back.
This is the test that makes it a working box.
- Ask your approved recipient to be ready.
- Hold the big button and record a short hello. Release it and follow the box’s confirmation prompts.
- Check that the message reached the right person or group.
- Ask them to reply with a voice note.
- Wait for the box’s incoming-message indication, then press to listen.
- Reboot the Pi using the command below, let it reconnect, and repeat the exchange.
ssh -t admin@button-box-001.local sudo reboot
The SSH connection will close during the reboot. That is expected. Keep the enclosure closed and the power accessible while you test.
Done when you can send, receive, and play a real voice message, then do it again after rebooting.
Before a child tries the box, an adult should complete these checks and supervise the whole session. The build is an experimental prototype.
A little help
along the way.
Questions from our builders, with answers checked against the current project instructions. Each answer has its own link.
18 answers
I’m comfortable with software, but new to hardware. Can I build this?
You can follow the software steps one at a time. For wiring, ask someone who can identify the switch terminals, check voltage levels, and inspect the finished circuit. This is still an alpha project, and the public lamp and NFC wiring documentation has gaps. Start with the Pi 4 and a roomy enclosure. See the assembly step.
How long should I allow?
In the community, Dan reported about an hour once all the parts were ready and he knew the build. That is an experienced repeat build, not a first-build promise. Set aside an afternoon as a planning allowance, plus separate time for printing, sourcing parts, and any debugging.
How much does it cost?
The reference-parts estimate in the repository is about US $150, excluding the enclosure, extra adapters, NFC tokens, shipping, and taxes. It is not a current shopping quote. Reusing compatible parts may reduce cost, but check their fit and electrical requirements. Open the parts list.
Can I use a Pi Zero or Zero 2 W instead of a Pi 4?
Choose a Pi 4B for this guide. Dan’s first box used a Zero 2 W, but the current public installer stops at a Pi-4-only Wi-Fi setup check. A Zero 2 W also needs an OTG hub for USB audio. The original Pi Zero is not a documented supported route. Do not remove the installer’s model check to push past the error.
Can I use a different microphone, speaker, or button?
Possibly. Other USB audio devices or GPIO buttons may work, but each substitution needs checking. The printed enclosure targets the reference parts; a replacement may need new mounting points or a revised shell. A roomy shoebox gives you more flexibility for an initial prototype.
Do I need a 3D printer?
No. Send the two STL files to a local printing service, or use a sturdy shoebox or other non-conductive enclosure. Secure the parts, insulate connections, allow ventilation, and protect the cables from strain. Compare the two routes.
Where are the latest STL files? Was the speaker opening fixed?
Download the top and bottom from the repository, rather than an earlier newsletter attachment. In the export, a maintainer reported that the repo version included the speaker-opening fix. Still check your speaker and button against the actual print before fastening everything. Download the current files.
Which pins do the button and LED use?
The software defaults are GPIO 17 for the switch and GPIO 26 for lamp control: physical pins 11 and 37. Pins 9 and 39 are ground. The switch and lamp are separate circuits. This does not specify a safe lamp driver; verify that circuit before power. Open the pin reference.
What positions should the PN532 selectors be in?
The software expects I²C mode. There is no confirmed universal selector setting in this export. HiLetgo modules and Waveshare HATs differ, so match your exact board’s I²C selector table, voltage requirements, and reset/request pins. Share a clear hardware-only photo in the community if you need help identifying it. Do not copy a switch position from an unidentified board.
Do I need to solder?
The reference HiLetgo PN532 kit needs soldering. The README suggests an assembled Waveshare PN532 NFC HAT if you want to avoid that, but you still need to check enclosure fit and access to the button pins. You can also start without NFC. Button connections depend on your chosen switch, terminals, and lamp circuit.
Why do I need another phone number if the box uses Wi-Fi?
Wi-Fi provides the internet connection. The number registers the box’s separate WhatsApp account, so it can appear as its own participant in a family conversation. Activate it on a phone and link the Pi as a companion device. The Pi itself does not need a SIM card.
Can I use an eSIM or an old phone?
An old phone can host the account if it supports the current WhatsApp app. A SIM or eSIM must give you a number that meets WhatsApp’s verification requirements. One builder reported call verification with a limited eSIM; that is one report, not a guarantee for another carrier. Check before buying, and retain access to the number.
Can the box send to a WhatsApp group?
Yes. Add the box’s dedicated account as a member of the group, then choose that group as an approved recipient in setup. A group can be useful for grandparents or a whole household. Check the chosen destination with a short test message before normal use.
Do I need NFC cards for the first build?
No. Start with a default person or group and skip NFC setup. Later, NFC cards can select among approved recipients. Once you pair cards, test each mapping; an unknown card or reader problem should not silently send to someone else.
The Pi or setup page won’t appear. What should I check?
Confirm that your computer or phone is on the same home network as the Pi, and use the hostname you chose in Imager. After hotspot setup, rejoin home Wi-Fi. If the hostname does not resolve, find the Pi in your router’s device list instead of guessing an address. Read the troubleshooting steps.
The installer says a setup file is missing, or refuses my Pi.
On a Mac, a missing setup file can mean the built-in rsync was used; install modern GNU rsync and use the Homebrew command in step 5. A Pi-4-only Comitup message is the documented board restriction, not a password problem. Stop there and check the supported-board instructions. Return to installation.
Is this an official WhatsApp integration?
No. Button Box uses wacli, an unofficial WhatsApp Web client, and is not affiliated with WhatsApp or Meta. Account interruption or loss is possible. Use the dedicated box account, and review the project’s account-safety notes before linking it.
Should I ask the community or open a GitHub issue?
Use the community for help while building. For a reproducible bug, missing instruction, or wiring clarification, open a GitHub issue. Include your Pi model, exact components, the step you reached, and what happened. Remove phone numbers, Wi-Fi details, pairing codes, recordings, and authentication data. Open an issue ↗.
No matching answer yet. Try another word, or ask the community.
Build it with a little help.
Join the community when you get stuck, or open the repository for the full instructions and files. If you use an AI coding assistant, give it this prompt:
Help me build a Button Box: https://github.com/button-box/button-box
Read README.md and AGENTS.md first. Ask which Pi I have.
Guide me one numbered step at a time, explaining each command.
Wait for me to confirm each physical checkpoint before continuing.
Do not guess a disk, GPIO connection, or recipient.
Do not ask me to paste passwords, phone numbers, pairing codes,
recordings, or authentication files into chat.